Ego Graffiti Lettering: An Embroidery Designer’s Honest Review
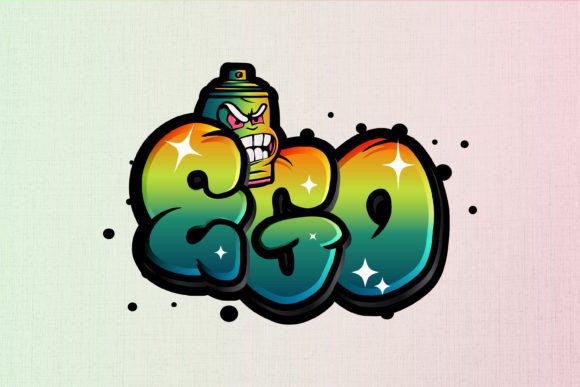
I opened the Ego file pack on a Tuesday morning while planning a set of custom streetwear hoodies for a small boutique client. The mood of the design hit me immediately — bold, unapologetic, and dripping with that raw urban art energy. It’s not just lettering; it reads like a marker flick on a textured wall, frozen in digital form. As someone who regularly moves graphics from screen to thread, I knew I needed to evaluate this one carefully before offering it as an embroidered product.
This pack is sold as T-Shirt Designs in the Graphics category, which is important. It does not include an embroidery file. What you get are high-quality design assets: an AI, EPS, SVG, and a crisp 300dpi PNG with a transparent background. That means if you want to stitch Ego onto a tote bag, cap, or sweatshirt, you’ll either need to digitize it yourself or work with an experienced digitizer. The vector formats are a dream for that process — clean lines, no pixelation when scaling — but the legwork of turning it into a stitch-ready file falls on you.
First Impressions and the Street Art Personality
The layout of Ego has that spontaneous graffiti rhythm that feels both messy and controlled. The letters overlap slightly, with jagged extensions, sharp angles, and a sense of movement that would look at home on the back of a denim jacket or across the front of a canvas tote. I imagined it stitched in a thick matte polyester thread, maybe a neon lime green against black cotton, or a gritty charcoal on an oatmeal linen apron. It’s a design that carries an attitude, the kind that resonates with buyers looking for something less polished and more authentic.
That kind of personality is gold for an embroidery designer crafting handmade product lines. It sets a tone immediately — rebellious, creative, a little playful. But that same energy demands careful handling once it hits the hoop. Graffiti artwork often lives in the in-between spaces: jagged edges, skinny connectors, overlapping layers. In embroidery, each of those translates into either a gorgeous textural detail or a potential stitching headache.
Real Project Scenario: Prepping a Patch for a Capsule Collection
Let me walk you through a real scenario. I had a request from a repeat customer who runs a small streetwear brand. She wanted a collection of embroidered patch designs to sew onto dad caps, hoodies, and canvas crossbody bags. The theme was “unfiltered self-expression,” so Ego felt like a natural candidate. I loaded the SVG file into my vector software first, cleaned up a few extraneous nodes, and started mentally mapping the stitch types.
The decision wasn’t whether the art looked good — it absolutely did. The question was how it would behave under a needle at 4 inches wide. I did a quick test digitizing, converting the sharp graffiti strokes into satin stitch columns and some of the speckled aesthetic into a lighter fill stitch background. I used two layers of cutaway stabilizer on a medium-weight twill fabric. The result? The bold shapes held up beautifully, but the thinnest trailing lines needed widening. That’s common with typography-based machine embroidery design conversion. I thickened those by just a few tenths of a millimeter, and suddenly the design looked like it had been born for thread.
Where Ego Shines as an Embroidered Graphic
After a few test stitch-outs, I started spotting the project types where Ego truly belongs:
- Custom apparel — oversized back prints on heavyweight hoodies, chest placements on long-sleeve tees, even a statement on the sleeve. The graffiti scale feels intentional when it has room to breathe.
- Tote bags and canvas pouches — the texture of canvas pairs wonderfully with the edge of the design. It becomes a conversation piece in a boutique setting.
- Embroidered patches — with a proper satin stitch border, Ego turns into a collectible patch. Think skate culture, artist collabs, or limited drops.
- Decorative pillow covers — surprisingly, this design on a raw linen pillow in monochrome thread gives an industrial-loft vibe that interior design clients love.
- Kitchen towels and aprons — a playful twist for a cook who doesn’t take themselves too seriously. Paired with a minimal font, it’s a fun gift.
- Boutique branding — small shops wanting a bold logo element can incorporate a cleaned version of the lettering onto work aprons, tote bags, or packaging accents.
For the digital product seller or Etsy seller, the PNG file included is another asset entirely. At 300dpi, it’s perfect for printable mockup creation. You can show customers exactly how the design will look on a t-shirt or tote before they even order. That’s a trust builder. I’ve been making my own previews with the transparent PNG dropped onto lifestyle photos, and the edge quality holds up beautifully.
Critical Stitch and Fabric Considerations
My excitement over Ego is tempered by a few hard-won lessons from the embroidery side. This is a design with countless tight corners, slim tails, and overlapping contours. When you’re converting it to a stitch file, here’s what demands your full attention:
- Hoop size awareness: If you want to preserve the raw detail and not simplify it into a blob, you’ll need at least a 5x7 hoop for decent legibility. The design shrinks down to 3.5 inches reluctantly, and anything smaller starts losing the graffiti nuance. Warn your customers if they ask for a tiny version — it won’t read the same.
- Fabric texture: This lettering can vanish into a high-pile fleece or terry cloth. Use a water-soluble topper on textured surfaces so the stitches sit on top rather than sinking in. On stretchy fabrics like jersey, a firm cutaway stabilizer is non-negotiable to keep the shapes from warping.
- Dark fabric tests: The graffiti style often looks best with contrast, but dark backgrounds can swallow certain thread colors. Do a test stitch on a charcoal swatch before committing to a whole run. I’ve had a rich navy thread disappear entirely on black denim, so I now mock up everything in grayscale first.
- Curved surfaces: On caps, the structured front panel can distort the sweeping lines. I position the design lower toward the brim and use a cap hoop with plenty of basting. Even then, I ask the client to approve a sample because the curve changes the baseline of the graffiti.
- Thin fabric and frequent washing: If used on a lightweight t-shirt, dense stitch areas could cause puckering. The fill stitch segments I tested on a 4oz cotton needed some density reduction. For anything that will be washed often, like a kitchen towel, secure the back with a soft cover stitch so the threads don’t catch or fray.
- Small lettering and tiny details: Some of the internal highlights in the graffiti text are incredibly fine. In embroidery, a running stitch under 1mm in length can become invisible or break. I simplified a few bits without losing the character, and I recommend you do a test on scrap fabric and compare it to the original image before finalizing.
How Ego Builds Customer Trust and Brand Consistency
When a handmade business stitches out Ego on a finished product, it sends a signal. It tells buyers you’re not afraid of edge, that you’ll deliver something beyond basic monograms. For a craft business or a small shop, this design can elevate an entire product line. I’ve noticed that my streetwear-inspired pieces sell out faster when the embroidery carries a distinct voice rather than a generic script. Ego delivers that voice in spades.
From a buyer’s perspective, the visual appeal of graffiti lettering makes the handmade item feel more exclusive. It’s the difference between a plain tote and a personalized gift that suggests thought and style. For holiday gifts — think embroidered denim jackets or a custom cap for a birthday — this design gets a reaction. It sticks in the memory. And when someone receives it and sees the stitching quality holding those sharp edges cleanly, it reinforces that your products are built to last.
I’ve also used the PNG TRANSPARENT FILE to create cohesive product photography across my Etsy listings. Consistency matters. When all your mockups show crisp, high-contrast designs, the shop feels curated. That professionalism converts browsers into buyers.
Practical Embroidery Designer Notes Before Stitching
If you decide to add Ego to your embroidery project lineup, here’s exactly what I’d do before offering it to customers:
- Test on scrap fabric first, especially the fabric you plan to sell. Wash the sample to see how the stitching holds up over time.
- Check thread color contrast. Graffiti thrives on contrast. A dark outline over a mid-tone fill can make the whole design pop, but test a few thread combinations to avoid a muddy look.
- Review stitch density. The source art has layered shapes; digitize with an underlay and moderate density to prevent the fabric from turning stiff. A balance between satin and fill stitch areas keeps it wearable.
- Confirm hoop size with every order. Don’t assume a one-size-fits-all approach. I list the digitized dimensions clearly and show a comparison photo with a ruler.
- Inspect small details in both light and dark thread versions. What looks crisp in white thread on black might blur in light gray on white. A quick trial saves embarrassment.
- Use a proper stabilizer. For most apparel, I use a medium cutaway. For patches, add a heat-seal backing after stitching.
- Compare light and dark fabric backgrounds. Take photos to show clients how perception changes — this builds trust and reduces returns.
- Check your commercial license. The listing offers the graphics as digital assets. Before selling finished embroidered items featuring Ego, verify the license terms with the designer. Not all graphic packs automatically grant commercial embroidery rights. This is crucial for commercial embroidery use.
When a Graphic Becomes Your Embroidery Signature
Ego as a name is fitting. The design demands a little ego from the stitcher too — confidence in your digitizing, faith in your machine, and the courage to put something this raw into the world. I’ve stitched it onto a reclaimed denim jacket, watched the threads catch the light on those aggressive angles, and felt that little spark. It’s not the easiest design to get right, but when you do, the result feels like wearable art. For a small shop owner or an independent maker, that’s exactly the kind of product that keeps customers tagging you on social media and coming back for the next drop.
If you’re building a craft business around bold, non-generic embroidery, Ego deserves a place in your test files. Just respect its quirks, honor the digitizing step, and let your samples guide the final stitch-out. The personality is already baked in — you simply bring it to the thread.